
For versions prior to 01/2026, following an improvement to the action management system (display, options and saving), it is necessary to reconfigure existing actions on devices.
Impact:
- Some actions may no longer display correctly
- Some actions may no longer execute as expected
Action required: 👉 Open each affected device 👉 Check and re-save the actions (clicks, entry/exit, etc.)
📡 Local network required
All myStrom and Dingz devices communicate over the local network. Your Jeedom box and your devices must be on the same Wi-Fi network. No cloud account is required for control.
🔁 Automatic myStrom discovery
Discovery uses UDP broadcast on port 7979. If your network is segmented (VLAN, different subnet), automatic discovery will not work — you will need to create devices manually by entering their IP address.
⏱️ Polling and state updates
Switch plugs and PIR use regular polling to update their state. The default interval is 10 seconds. Buttons and Dingz work via callback: the device notifies Jeedom when an event occurs.
📖 Overview
The Smart Home plugin integrates two ranges of Swiss-made connected devices into Jeedom:
- myStrom (official site) — smart plugs, WiFi buttons, bulbs, LED strips, motion detectors
- Dingz (official site) — wall-mounted WiFi switches with shutters, dimmers and configurable buttons
Communication is entirely over the local network, with no cloud dependency. The plugin automatically handles discovery, command creation and state updates.
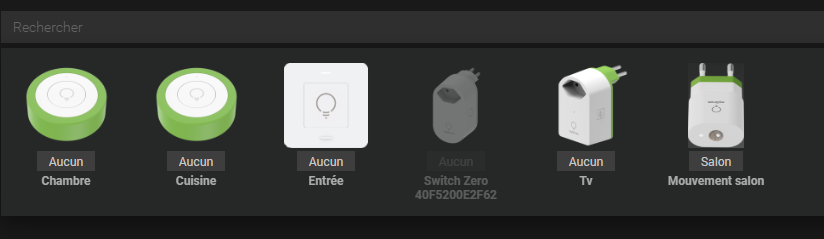
🔌 Supported devices
myStrom
| Device | Description |
|---|---|
| Switch / Switch EU | Smart plug with power consumption measurement |
| Switch Zero | Smart plug without power consumption measurement |
| Button | Simple WiFi button (1 button) |
| Button+ | WiFi button with touch detection |
| Button+ 2nd generation | WiFi button with 4 buttons + temperature + humidity |
| Bulb | Color smart bulb |
| Strip | Color LED strip |
| PIR | Motion detector + temperature + brightness |
Dingz
| Device | Description |
|---|---|
| Dingz | Wall-mounted WiFi switch with 4 buttons + color LED |
| Dingz+ | Dingz with built-in motion detector |
| Dingz Shutters | Motorized shutters controlled via Dingz (1 or 2 shutters) |
✅ Prerequisites
- Jeedom version 3.3 minimum
- Local network with myStrom / Dingz devices on the same subnet as the Jeedom box
- Devices must already be configured and connected to your Wi-Fi network via their official app
🚀 Installation
- Install the plugin from the Jeedom Market
- Activate the plugin
- The plugin is ready to use — no external dependencies required
🔍 Automatic myStrom discovery
The plugin can automatically detect all myStrom devices on your local network.
- Go to Plugins → Plugin Management → Smart Home → Configuration
- Click Scan network
- The plugin listens for a few seconds for myStrom device announcements
- Detected devices are automatically created in Jeedom
The result shows the number of devices created, updated, ignored, as well as the detailed list with IP, type and MAC address.

If no device is found, create them manually from the device list (Add button) by entering the device type and IP address.
Part 1 — myStrom
⚙️ Configuring a myStrom button
This procedure is only necessary during the first installation or after a plugin update to version 2.0.
🔄 1. Reset the button (if already connected to the network)
- Press and hold the button for 10 seconds
- It flashes red / white → release
- Within 5 seconds, press once
- It flashes 10 times in white
➡️ The button is reset (factory mode) — the Wi-Fi connection is cleared.
📱 2. Add the button in the myStrom app
- Open the myStrom app
- Add a device (WiFi Button)
- Follow the steps until the connection is successful
⚡ 3. Quick synchronization with Jeedom
The button disappears quickly from the network — you have a few seconds to register it in Jeedom.
- Go to the plugin's General Configuration page
- Click Synchronize, or add the device manually
🔧 4. Finalize in Jeedom
- Open the created device
- Click Update
✅ You should receive a confirmation (commands created successfully).
🎯 5. Usage
You can now associate your actions with different click types:
- Single click
- Double click
- Long press
Once configured, there is no need to click Update for each use.
- Reset (once only)
- Add in the myStrom app
- ⚡ Quick synchronization in Jeedom
- Update → ✅
- Configure actions
🔌 Switch plug
The myStrom Switch is a smart plug that lets you turn a device on or off remotely and measure its power consumption in real-time.
Two variants are supported:
- Switch — plug with CH (Swiss) connector
- Switch EU — plug with EU connector
Available commands
| Command | Type | Unit | Description |
|---|---|---|---|
| State | Info | — | On (1) or off (0) |
| On | Action | — | Turns on the plug |
| Off | Action | — | Turns off the plug |
| Toggle | Action | — | Inverts the current state |
| Temperature | Info | °C | Internal plug temperature |
| Consumption | Info | W | Real-time power consumption |
Configuration
| Field | Description |
|---|---|
| IP address | Local IP address of the plug (e.g. 192.168.1.50) |
| MAC address | Device MAC address (filled automatically during discovery) |
| Polling frequency | State update interval in seconds (default: 10 s, minimum: 2 s) |
🔌 Switch Zero plug
The Switch Zero is a simplified version of the Switch plug, without power consumption measurement.
Available commands
| Command | Type | Description |
|---|---|---|
| Online | Info | Device is reachable on the network |
| State | Info | On (1) or off (0) |
| On | Action | Turns on the plug |
| Off | Action | Turns off the plug |
Configuration
Identical to the Switch: IP address, MAC address and polling frequency.
🔘 WiFi Button
The myStrom Button is a battery-powered portable WiFi button. It detects three types of presses and triggers configurable actions in Jeedom.
Recognized press types
| Press | Description |
|---|---|
| Single click | One short press |
| Double click | Two quick presses |
| Long press | Sustained press |
Available commands
| Command | Type | Visible | Description |
|---|---|---|---|
| Firmware version | Info | No | Installed firmware version |
| Battery voltage | Info | Yes | Battery voltage in volts |
| Cloud reachable | Info | No | Reachability via the myStrom cloud |
| Charging | Info | No | Battery currently charging |
| Single Click | Action | No | Event triggered on each single press |
| Double Click | Action | No | Event triggered on each double press |
| Long Press | Action | No | Event triggered on each long press |
| Update | Action | Yes | Synchronizes callbacks to Jeedom |
Configuration
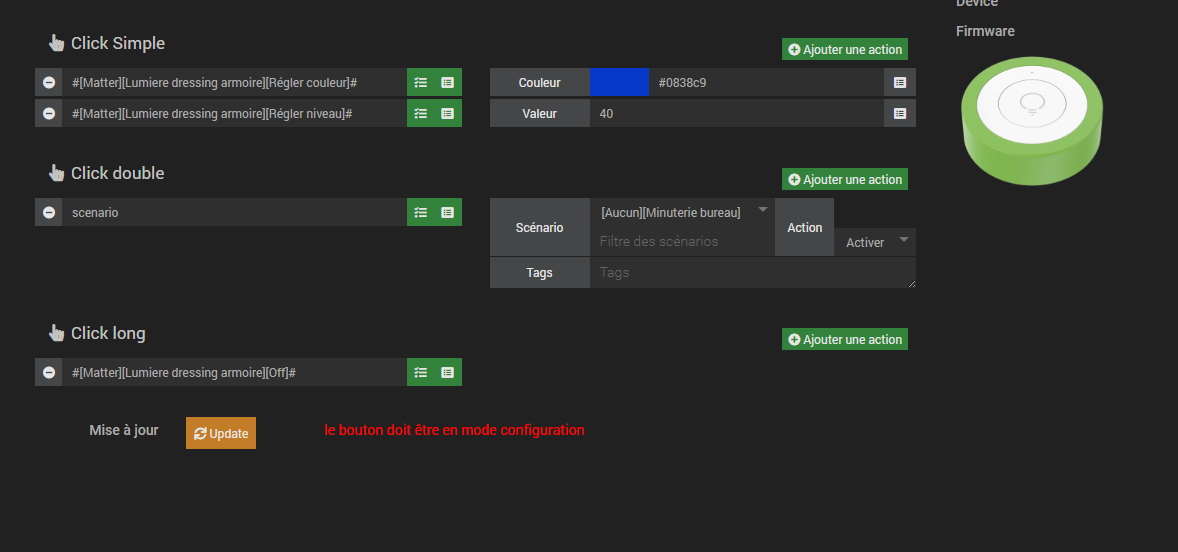
- Enter the button's IP address
- For each press type, add the Jeedom actions to execute (scenarios, commands from other devices…)
- Click Update to send the configuration to the button — it will call Jeedom on each press
When you press a myStrom button, it sends an HTTP request directly to Jeedom (callback). For this to work, Jeedom must be reachable from the button on the local network. Click Update after any configuration change so the button knows your Jeedom's address.
🔘 WiFi Button+ (Button+)
The Button+ adds touch detection to the standard Button functions: by touching the top of the button without pressing, an additional action can be triggered.
Additional commands compared to the Button
| Command | Type | Description |
|---|---|---|
| Touch | Action | Event triggered on touch |
Configuration is identical to the Button, with an additional Touch block.
🔘 WiFi Button+ 2nd generation (Button+ Gen2)
The 2nd generation Button+ is a WiFi remote with 4 physical buttons, a temperature sensor, a humidity sensor and a charging port.
Available commands
| Command | Type | Unit | Visible | Description |
|---|---|---|---|---|
| Firmware version | Info | — | No | Firmware version |
| Battery voltage | Info | V | Yes | Battery level |
| Charging | Info | — | Yes | Charger connected and charging |
| Charger voltage | Info | V | Yes | Connected charger voltage |
| Charger connected | Info | — | Yes | Charger plugged in (1) or not (0) |
| Temperature | Info | °C | Yes | Ambient temperature |
| Humidity | Info | % | Yes | Ambient humidity |
| Button 1 — Single | Action | — | No | Single press on button 1 |
| Button 1 — Double | Action | — | No | Double press on button 1 |
| Button 1 — Long | Action | — | No | Long press on button 1 |
| Button 2 — Single | Action | — | No | Single press on button 2 |
| Button 2 — Double | Action | — | No | Double press on button 2 |
| Button 2 — Long | Action | — | No | Long press on button 2 |
| Button 3 — Single | Action | — | No | Single press on button 3 |
| Button 3 — Double | Action | — | No | Double press on button 3 |
| Button 3 — Long | Action | — | No | Long press on button 3 |
| Button 4 — Single | Action | — | No | Single press on button 4 |
| Button 4 — Double | Action | — | No | Double press on button 4 |
| Button 4 — Long | Action | — | No | Long press on button 4 |
| Touch | Action | — | No | Touch |
| Update | Action | — | Yes | Synchronizes callbacks to Jeedom |
Configuration
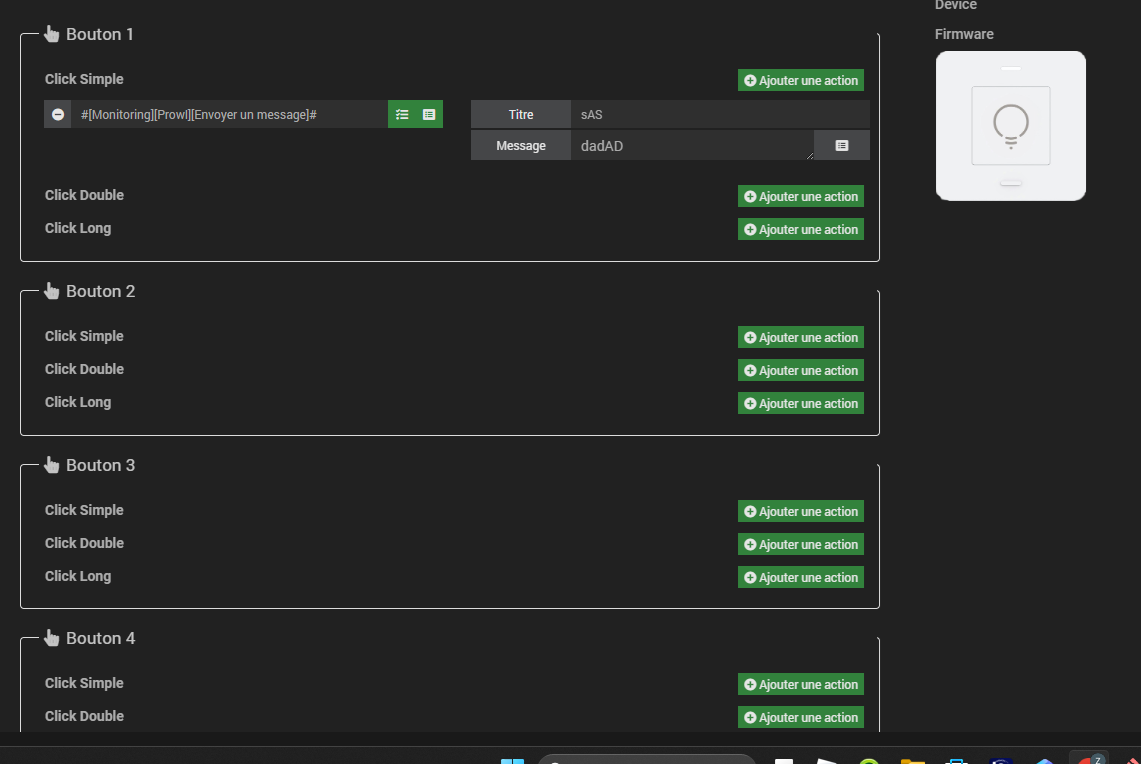
The configuration exposes 4 panels, one per button. Each panel lets you define the actions to execute for single, double and long presses.
As with the standard Button, click Update after configuration to register the callbacks on the device.
💡 Smart bulb (Bulb)
The myStrom Bulb is a WiFi bulb with warm/cool white light and RGB color. It can be controlled on/off, by brightness and by color from Jeedom.
Available commands
| Command | Type | Visible | Description |
|---|---|---|---|
| On | Action | Yes | Turns on the bulb |
| Off | Action | Yes | Turns off the bulb |
| Toggle | Action | Yes | Inverts the state |
| State | Info | Yes | On (1) or off (0) |
| Color state | Info | No | Current color (internal format) |
| Color | Action | Yes | Choose the color (Jeedom color picker) |
| Brightness | Action | Yes | Set brightness from 0 to 100% (slider) |
| Consumption | Info | Yes | Power consumption in W |
| Mode | Info | No | Active lighting mode |
Configuration
| Field | Description |
|---|---|
| IP address | Local IP address of the bulb |
| MAC address | Filled automatically during discovery |
🌈 LED strip (Strip)
The myStrom Strip is a WiFi color LED strip. Its commands and configuration are identical to the Bulb.
| Command | Type | Description |
|---|---|---|
| On / Off / Toggle | Action | Turn on, turn off, toggle |
| State | Info | On or off |
| Color | Action | Choose the color |
| Brightness | Action | Brightness from 0 to 100% (slider) |
| Consumption | Info | Power in W |
🚶 Motion detector (PIR)
The myStrom PIR is a WiFi motion detector that also measures temperature and ambient brightness. It notifies Jeedom in real-time via callback on each detection or end of detection.
Available commands
| Command | Type | Unit | Description |
|---|---|---|---|
| State | Info | — | Motion detected (1) or not (0) |
| Temperature | Info | °C | Ambient temperature |
| Brightness | Info | lux | Ambient brightness |
| Presence | Action | — | Event triggered on each detection |
| Absence | Action | — | Event triggered at the end of detection |
Main configuration
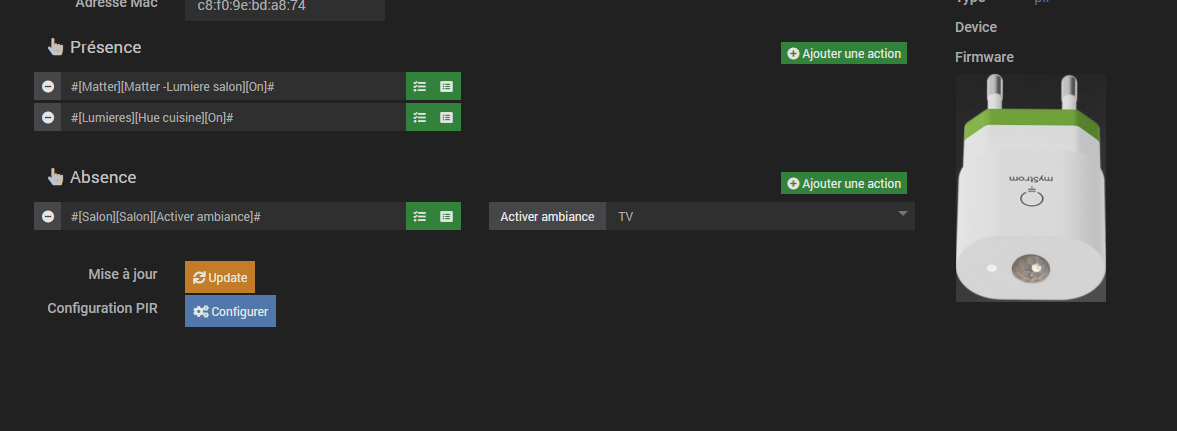
| Field | Description |
|---|---|
| IP address | Local IP address of the PIR |
| MAC address | Filled automatically |
| Presence | Actions to execute on detection |
| Absence | Actions to execute at end of detection |
Click Update to register the callbacks on the device.
Advanced PIR configuration
The PIR Configuration button opens an advanced settings panel sent directly to the device:
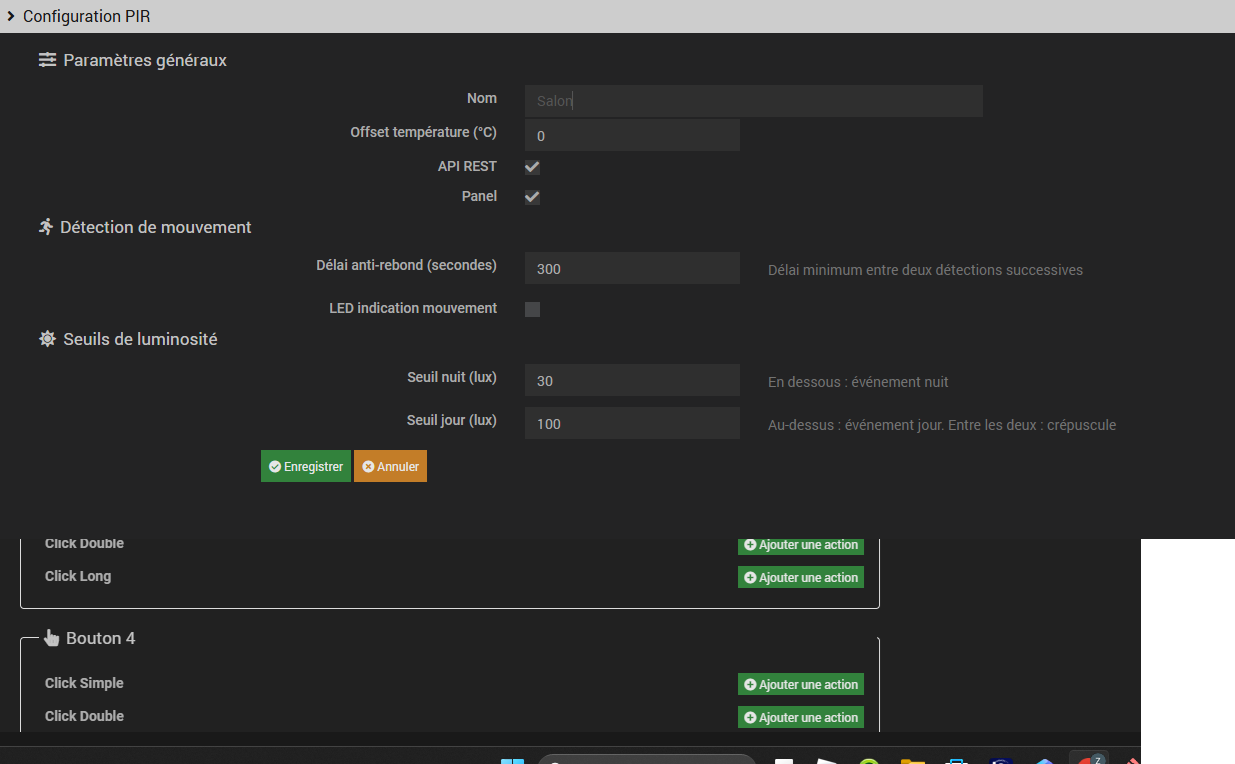
| Setting | Description |
|---|---|
| Name | Device name on the network |
| Temperature offset | Temperature value correction (from −10 to +10 °C, step 0.5) |
| REST API | Enables the device's local REST API |
| Panel | Enables display in the app panel |
| Debounce delay | Delay before considering no more presence (1 to 84,600 seconds, default: 10 s) |
| LED indication | Device LED blinks on detection |
| Night threshold | Brightness threshold below which it is considered night (default: 30 lux) |
| Day threshold | Brightness threshold above which it is considered day (default: 300 lux) |
Part 2 — Dingz
📖 Dingz overview
The Dingz is a Swiss wall-mounted WiFi switch that replaces traditional switches. It includes:
- 4 capacitive buttons independently configurable
- A front-facing color status LED
- A temperature sensor
- Motorized shutter management (replacing one or two shutters)
- A PIR motion detector (on the Dingz+ model)
The Dingz communicates entirely locally via its HTTP API. Jeedom registers callbacks on the device to be notified in real-time of each press.
Dingz
Available commands
Status LED
| Command | Type | Description |
|---|---|---|
| On | Action | Turns on the front LED |
| Off | Action | Turns off the front LED |
| LED state | Info | LED on (1) or off (0) |
| Color | Action | Choose the LED color (color picker) |
| Color state | Info | Current LED color |
Sensor
| Command | Type | Unit | Description |
|---|---|---|---|
| Temperature | Info | °C | Temperature measured by the Dingz |
Buttons (1 to 4)
For each of the 4 physical buttons on the Dingz:
| Command | Type | Description |
|---|---|---|
| Button N state | Info | Button pressed (1) or released (0) |
| Button N brightness | Info | Dimming level in % |
| Button N on | Action | Turns on the corresponding channel |
| Button N off | Action | Turns off the corresponding channel |
| Button N toggle | Action | Inverts the channel state |
Configuration
| Field | Description |
|---|---|
| IP address | Local IP address of the Dingz |
For each of the 4 buttons, configure the actions to execute based on press type:
- Single click
- Double click
- Long press
Click Update to register the callbacks on the Dingz.
When a button is pressed, the Dingz sends an HTTP request directly to Jeedom. After each configuration change, click Update so the Dingz knows the exact address of your Jeedom and the associated actions.
Dingz+
The Dingz+ is identical to the Dingz, with an additional built-in PIR motion detector in the housing.
Additional commands compared to the Dingz
| Command | Type | Description |
|---|---|---|
| PIR / General | Action | Event triggered by the built-in motion detector |
Configuration
Configuration is identical to the Dingz, with an additional PIR / General block at the top of the modal, allowing you to define actions to execute on motion detection.
🪟 Motorized shutters (Dingz)
When a Dingz is configured to control motorized shutters, the plugin creates associated shutter devices. The Dingz can manage up to 2 independent shutters.
Each shutter is a separate device in Jeedom, linked to the parent Dingz.
Available commands (per shutter)
| Command | Type | Unit | Description |
|---|---|---|---|
| Shutter state | Info | % | Current shutter position (0 = open, 100 = closed) |
| Slat state | Info | % | Slat angle (louvered shutters) |
| Up | Action | — | Raises the shutter |
| Down | Action | — | Lowers the shutter |
| Stop | Action | — | Stops the current movement |
| Position | Action | % (0–100) | Moves the shutter to a specific position (slider) |
The Position command uses a slider from 0 to 100. 0 means the shutter is open, 100 means the shutter is closed.
🏠 Using in Jeedom
Once devices are created, they are available in Plugins → Connected Objects → Smart Home.
Commands can be used in:
- scenarios — trigger an action on button press, on motion detection…
- dashboard widgets
- voice interactions
- alerts and notifications
Commands are automatically generated from profiles built into the plugin — no manual command configuration is needed.
Common usage example
myStrom Button → Jeedom Scenario:
- Configure the button with the IP and actions for "Single Click"
- Add a Jeedom scenario execution in the "Single Click" block
- Click Update to register on the device
- On each press, the scenario triggers automatically
PIR → Presence alert:
- Configure the PIR with the IP
- Add a notification in the "Presence" block
- Click Update
- On each detection, Jeedom sends the notification
🩺 Health page
The Health page checks the overall state of the plugin and your devices: connectivity, polling service status, unreachable devices.
Access: from the device list, click the Health icon at the top of the page.
🛠️ Troubleshooting
Automatic discovery finds no devices
- Check that your Jeedom and myStrom devices are on the same subnet
- If your network uses VLANs, UDP discovery will not cross segments — create devices manually
- Check that port 7979 is not blocked by a firewall
A button or the Dingz no longer responds to Jeedom
- Your Jeedom's IP address may have changed — reopen the device configuration and click Update to re-register the callbacks
- Check that the device's IP address has not changed (assign static DHCP leases to avoid this issue)
The Switch plug state is not updating
- Check that the plug's IP address is correct in the configuration
- Reduce the polling frequency if the state is too slow to update ("Polling frequency" field)
- Check the plugin logs (Analysis → Logs → mystr0m)
The bulb or Dingz LED color is not applied
- Make sure the bulb / Dingz is turned on before sending a color command
- The color command uses Jeedom's native color picker
The PIR no longer detects motion
- Click Update in the PIR configuration to re-register the callbacks
- Check the "Debounce delay" setting in the advanced configuration — if it is too high, the PIR considers continuous presence
- Check the plugin logs to see if PIR requests are reaching Jeedom