
The MQTT Manager plugin must be installed and functional.
Before using WhatWatt, check that:
- the MQTT Manager plugin is installed
- the MQTT Manager daemon is started
- the MQTT broker is accessible from Jeedom
- the WhatWatt device is properly publishing its data to the configured topic
Without an active MQTT Manager, the WhatWatt plugin cannot receive MQTT data from the meter.
User Manual — WhatWatt Plugin
The WhatWatt plugin integrates the WhatWatt connected energy meter into Jeedom to monitor in real-time:
- electricity consumption
- grid injection
- total energy
- voltages and currents
- per-phase data
- advanced grid values
- Live SSE data
- MQTT communication status
The plugin uses MQTT as the primary source and can automatically use Live SSE as a fallback.
Main features
Native MQTT integration
The plugin uses Jeedom's MQTT Manager plugin to receive data sent by WhatWatt.
Features:
- automatic meter discovery
- automatic device creation
- automatic command creation
- real-time updates
- multi-meter support
- last received payload retention
- built-in MQTT diagnostics
Default listening topic:
whatwatt/+/state
Recommended topic on the WhatWatt side:
whatwatt/${sys.id}/state
Live SSE fallback
The plugin includes a NodeJS daemon that can use the WhatWatt device's Live API.
Live SSE is primarily used:
- as an MQTT backup
- for diagnostics
- to continue receiving values if MQTT becomes unavailable
The daemon:
- handles real-time streaming
- supports authentication
- automatically masks sensitive information in logs
- monitors connection status
- automatically switches the active source
Automatic device creation
When a new meter is detected:
- the plugin automatically identifies it
- the Jeedom device is created
- commands are automatically generated
- units and types are configured
- values are immediately updated
The plugin can also:
- recreate commands from the last payload
- automatically add newly discovered values
- retain technical data useful for diagnostics
Installation
1 — Install the plugin
From the Jeedom Market:
Plugins → Plugin Management → Market
Install then activate the WhatWatt plugin.
2 — Verify MQTT Manager
The plugin requires:
- the MQTT Manager plugin
- a functional MQTT broker
- an active MQTT daemon
3 — Configure the WhatWatt device
In the plugin configuration, a wizard automatically displays:
- the MQTT broker
- the port
- the topic
- the username
- the password
to simplify the WhatWatt device configuration.
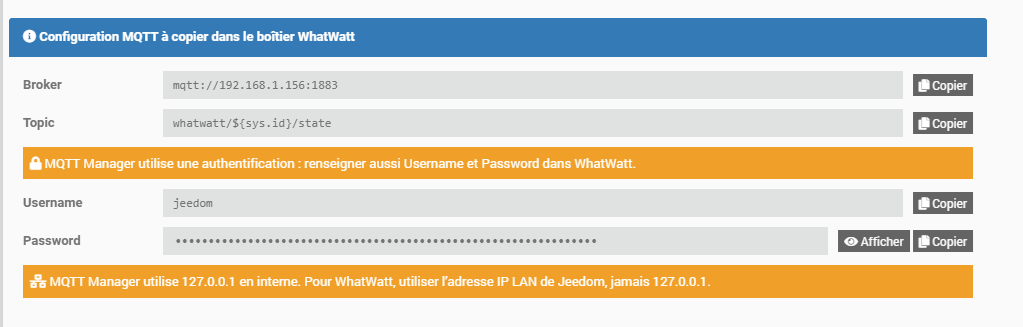
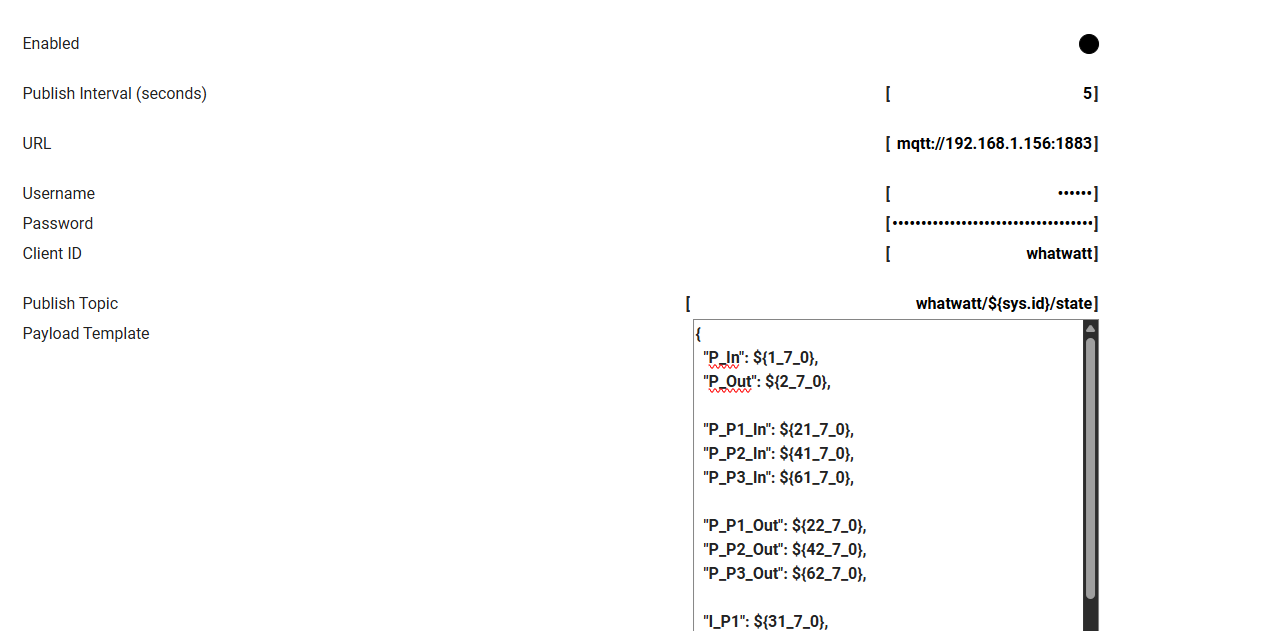
In the WhatWatt interface:
- enable MQTT
- enter the MQTT login, password and topic defined in the plugin's general configuration
- Copy the following payload into the WhatWatt device's MQTT configuration
This payload allows the plugin to retrieve:
- energy measurements
- meter information
- network information
- WhatWatt system data
{
  "P_In": ${1_7_0},
  "P_Out": ${2_7_0},

  "P_P1_In": ${21_7_0},
  "P_P2_In": ${41_7_0},
  "P_P3_In": ${61_7_0},

  "P_P1_Out": ${22_7_0},
  "P_P2_Out": ${42_7_0},
  "P_P3_Out": ${62_7_0},

  "I_P1": ${31_7_0},
  "I_P2": ${51_7_0},
  "I_P3": ${71_7_0},

  "V_P1": ${32_7_0},
  "V_P2": ${52_7_0},
  "V_P3": ${72_7_0},

  "rP_In": ${3_7_0},
  "rP_Out": ${4_7_0},

  "E_In": ${1_8_0},
  "E_Out": ${2_8_0},

  "rE_In": ${3_8_0},
  "rE_Out": ${4_8_0},
  "Apparent_Power": ${9_7_0},
  "Power_Factor": ${13_7_0},
  "Tariff": ${tariff},
  "Firmware": "${sys.firmware}",
  "DateTime": "${meter.date_time}",
  "Wifi_Status": "${wifi.sta.status}",
  "Wifi_RSSI": "${wifi.sta.rssi}",
  "Wifi_IP": "${wifi.sta.ip}",
  "Eth_State": "${eth.state}",
  "Eth_IP": "${eth.ip}",
  "Meter_Status": "${meter.status}",
  "Meter_Model": "${meter.model}",
  "Meter_Vendor": "${meter.vendor}",
  "Sys_Id": "${sys.id}"
}
- save the configuration
After a few seconds, the device appears automatically in Jeedom.
WhatWatt device
Each device contains:
- the system identifier
- the MQTT topic
- the last MQTT payload
- the last Live SSE payload
- etc.
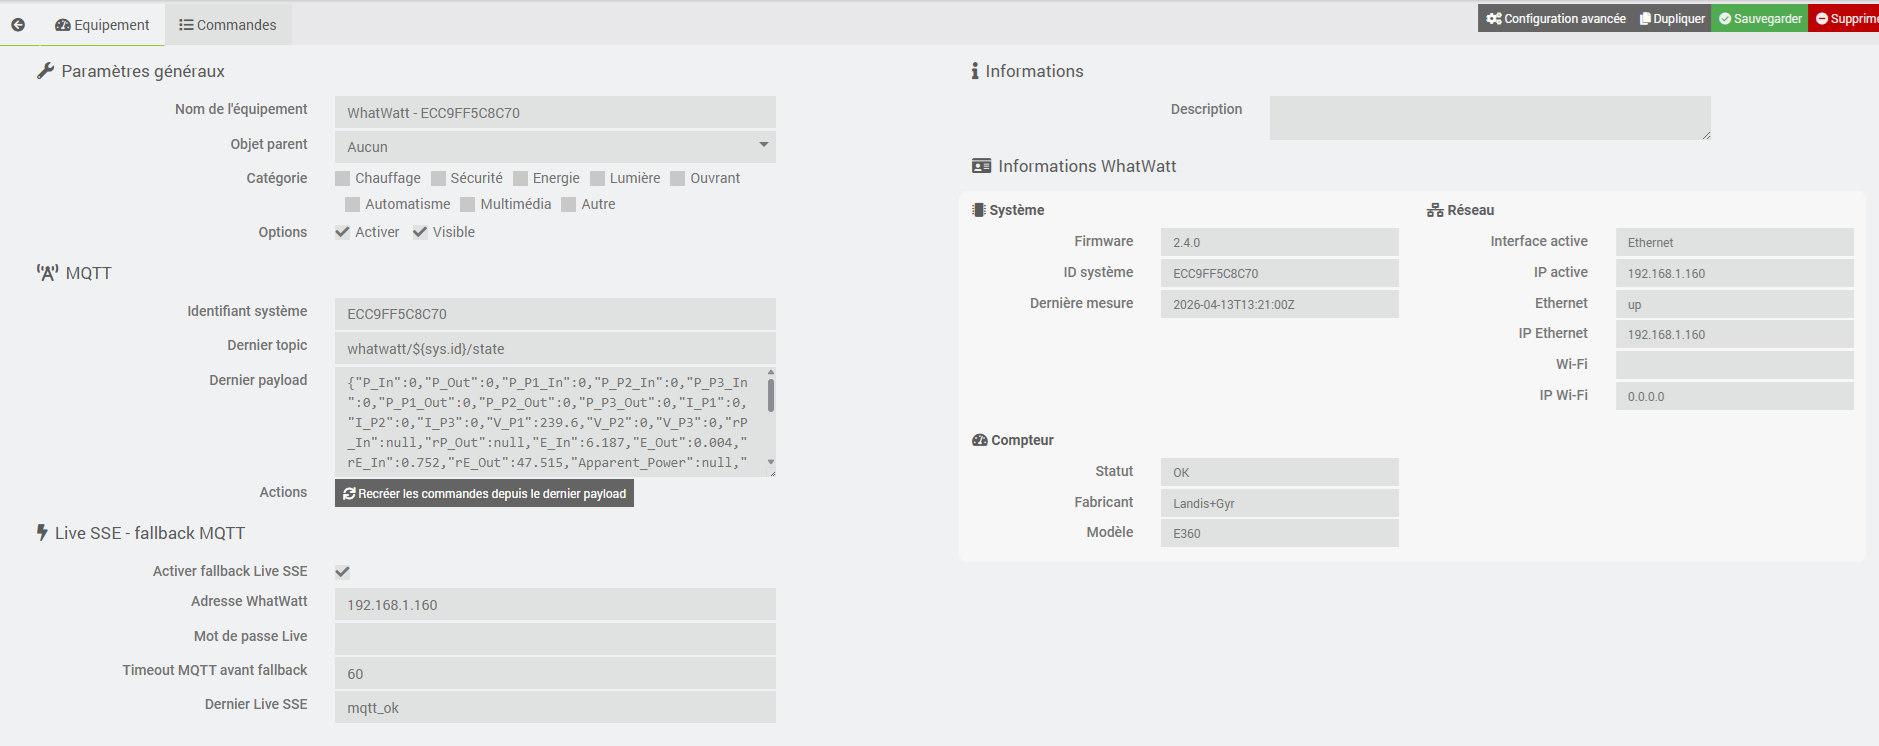
The plugin can operate:
- in MQTT only mode
- in Live SSE only mode
- in hybrid MQTT + Live SSE fallback mode
📊 WhatWatt variables
The data reported by WhatWatt lets you monitor electricity consumption, potential injection, meter status and several technical details useful for diagnostics.
⚠️ Not all values are necessarily available depending on the meter, protocol used, firmware or connected interface.
A missing or
nullvalue is not necessarily an error: it generally means the meter does not provide this information.
⚡ Default visible variables
These commands correspond to the most useful daily information.
🔌 Power consumed Instantaneous power used by your installation. → This is the main value for real-time consumption monitoring.
🔋 Power injected
Power sent back to the grid, for example with solar panels.
→ The value generally stays at 0 if no production is present.
📈 Energy consumed Total energy used by the installation. → Used for overall consumption tracking and bill calculation.
📉 Energy injected Total energy sent back to the grid. → Mainly useful for solar production or self-consumption.
⚡ Voltage L1 / L2 / L3 Electrical voltage per phase, expressed in volts. → In single-phase, only L1 is generally populated. The expected value is around 230 V.
🔌 Current L1 / L2 / L3 Electrical current per phase, expressed in amps. → Lets you visualize the instantaneous load on each phase.
📡 Meter status Communication status with the meter. Possible examples:
OK→ normal operationNO DATA→ no usable data receivedNOT CONNECTED→ meter not detected or unreachable
🕒 Meter date Date and time provided by the meter. → Lets you verify the consistency and freshness of received data.
⚙️ Advanced variables
These commands are useful for more detailed installation analysis.
⚡ Power consumed L1 / L2 / L3 Detailed consumption per phase. → Very useful in three-phase setups to balance loads.
🔋 Power injected L1 / L2 / L3 Detailed energy injection per phase. → Lets you analyze production distribution.
🧾 Tariff Current tariff, for example peak / off-peak hours if the information is available. → Useful for automations and cost calculations.
📊 Power factor
Consumption quality indicator, generally between 0 and 1.
→ 1 corresponds to optimal consumption; a low value may indicate losses or inefficient load.
⚡ Apparent power Total power seen by the grid, expressed in VA or kVA depending on the source. → Useful for monitoring called power and electricity subscription.
🛠️ Technical variables
This information is mainly useful for diagnostics, support and expert mode.
⚡ Reactive power Power related to inductive or capacitive loads, such as certain motors or transformers. → It does not directly correspond to actually consumed energy, but can influence electrical quality.
📈 Reactive energy Accumulation of reactive power over time. → Mainly useful for advanced analysis or debugging.
📶 WiFi RSSI
Wi-Fi signal quality, expressed in dBm.
→ Example: -50 dBm is good, -80 dBm is weak.
🌐 WiFi IP WhatWatt IP address on the Wi-Fi network. → Useful for checking connectivity or accessing the device interface.
🔌 Ethernet state
Wired connection status, for example up or down.
→ Lets you know if the device is using or detecting the Ethernet network.
🧠 Firmware WhatWatt software version. → Useful information for support, updates and debugging.
🆔 System ID Unique WhatWatt device identifier. → Lets you differentiate multiple devices.
⚙️ Meter type Type of connected meter, for example DSMR, DLMS or other depending on the installation.
🔗 Meter protocol Protocol used to read meter data.
🎯 Display level summary
- Essential → power, energy and daily monitoring
- Advanced → per-phase analysis, tariff, optimization
- Technical → network diagnostics, meter, firmware and debugging
Available commands
Commands are automatically generated based on received data.
Main values
| Command | Description |
|---|---|
| Power consumed | Instantaneous consumption |
| Power injected | Instantaneous grid injection |
| Energy consumed | Total energy consumed |
| Energy injected | Total energy injected |
| Tariff | Current tariff |
| Data source | MQTT or Live SSE |
| Last communication | Last update |
Per-phase values
| Command | Description |
|---|---|
| Voltage L1/L2/L3 | Voltage per phase |
| Current L1/L2/L3 | Current per phase |
| Power phase 1/2/3 | Detailed power |
Advanced values
Depending on data sent by WhatWatt:
- apparent power
- reactive power
- reactive energy
- power factor
- network information
- technical information
Automatic power conversion
The plugin can automatically convert power values to watts on the Jeedom side.
Available option:
Convert power to W
This option is useful if the device sends certain values in kW.
Live SSE mode
Activation
In the device:
- enable the Live SSE fallback
- enter the device IP address
- enter the Live password if needed
- set the MQTT timeout
Example:
192.168.1.160
Health page
The plugin has an advanced Health page to check:
- MQTT status
- Live SSE daemon status
- last MQTT reception
- last Live reception
- active source
- configured devices
- latest network errors
- critical values
- MQTT ↔ Live switches
This page greatly simplifies diagnostics.
Logs
Available logs:
| Log | Description |
|---|---|
| whatwatt | Main plugin log |
| whatwatt_live | Live SSE daemon |
| mqtt2 | MQTT reception |
Debug mode is recommended only for diagnostics.
Troubleshooting
No device created
Check:
- MQTT Manager active
- broker accessible
- correct MQTT topic
- MQTT daemon started
- network communication OK
No MQTT data
Check:
whatwatt/${sys.id}/state
and verify:
- broker IP
- MQTT credentials
- firewall
- local network
Live SSE not working
Test:
http://IP_WHATWATT/api/v1/live
or:
curl -N --digest -u ":password" "http://IP_WHATWATT/api/v1/live"
Then check:
- password
- local network
- WhatWatt Live daemon
- plugin logs
Recommendations
For optimal use:
- use MQTT as the primary source
- enable the Live SSE fallback only as a backup
- avoid Debug mode permanently
- keep a stable MQTT broker on the local network